Showing posts with label Servers configuration. Show all posts

Sunday, May 30, 2010

How to find out the best dns server for your system?


In my previous post I have mentioned about some public DNS servers, that you can use instead of the servers mentioned by ur ISP.
Now you might be in a confusion that Which servers are best for you.
This checking simply consists of pinging from your system to all the nameservers one after another and to see the one that is having minimum average time to do this, take your terminal and type in as follows

1: $ ping -c 5 8.8.8.8
2: Checkout the average time needed for the process.
Its shown in   the terminal. Replace the address
8.8.8.8 with all other  dns addresses and repeat steps 1 and 2.

Which ever DNS has the least average time is the one you are searching for.

Thursday, March 18, 2010

Install of Apache, SSL, PHP, MySQL in linux


The following steps will show you how to install the Apache web server on GNU/Linux. This install also includes installing mod_ssl, MySQL and PHP4.You may encounter problems compiling any one of these tarballs. It is up to you to fix the problems. This install assumes that you have everything you need to do all of the compiles. The x's in each file name stands for what ever the version number is at the time you download it.

Download and extract all the source tarballs.

The following are links to the sites you will need to download the source files. Go to each sites download section and download the latest version of each piece of software. After you have downloaded them all to the same directory we are going to unzip and untar them.

Apache http://www.apache.org/dyn/closer.cgi

Openssl http://openssl.org/

ModSSL http://www.modssl.org/

Php.net

MySQL.com (Download the Linux binary version)

tar -xvzf apache_1.3.xx.tar.gz

tar -xvzf openssl-0.9.Xx

tar -xvzf mod_ssl-2.X.xx-1.3.xx

tar -xvzf php-4.X.x.tar.gz

Install MySQL (binary version)

groupadd mysql

useradd -g mysql mysql

cd /usr/local

gunzip < /path/to/mysql-VERSION-OS.tar.gz | tar xvf -

ln -s full-path-to-mysql-VERSION-OS mysql

cd mysql

scripts/mysql_install_db

chown -R root .

chown -R mysql data

chgrp -R mysql .

bin/safe_mysqld --user=mysql &

or

bin/mysqld_safe --user=mysql &

## if you are running MySQL 4.x

Build OpenSSL

cd openssl-0.9.Xx

./config

make

make test

make install

cd ..

Patch Apache with mod_ssl

cd mod_ssl-2.X.xx-1.3.xx

./configure --with-apache=../apache_1.3.xx

cd ..

Preconfigure Apache for PHP

cd apache_1.3.xx

./configure --prefix=/usr/local/apache

cd ..

Configure PHP and compile it for Apache

cd php-4.x.x

CFLAGS='-O2 -I../openssl-0.9.Xx'

./configure --with-apache=../apache_1.3.xx --with-mysql

make

make install

cd ..

or

You can configure and compile a ton of other things into PHP.Make sure if you compile these other things in that you scan back thru the configure output to make sure all of the things you tried to compile in were found. If you install the libjpeg,freetype,libpng,and zlib on RedHat you just need to put /usr in for the directory. Other paths refer to the areas the library's were installed and compiled. Type: ./configure --help to see all of the things you can configure PHP with. My config line looks like this:

./configure \

--with-gd=/usr \

--with-mysql \

--with-png-dir=/usr \

--with-zlib-dir=/usr \

--with-ttf=/tmp/freetype-2.0.5/ \

--with-freetype-dir=/tmp/freetype-2.0.x \

--with-jpeg-dir=/usr \

--with-mcrypt=/tmp/libmcrypt \

--with-apache=../apache_1.3.xx

make

make install

cd ..

Build Apache with mod_ssl and PHP

cd apache_1.3.xx

SSL_BASE=../openssl-0.9.Xx \

./configure \

--prefix=/usr/local/apache \

--enable-module=ssl \

--activate-module=src/modules/php4/libphp4.a \

--enable-module=php4

make

make certificate <--Optional step.

make install

cd ..

Configure Apache's Preferences File

vi /usr/local/apache/conf/httpd.conf

See the Apache documentation on how to configure your Apache httpd.conf.

Start your Apache server

Service httpd start

That's it, enjoy!

Thursday, December 3, 2009

Installing Nagios in Linux (Fedora/Red hat):

My experience while installing Nagios on my RHEL5 machine:

After hearing a lot about Nagios I finally thought I should give it a try, there started my 3 days of struggle. As I’m working in an IT company I do get very less time to experiment on anything.

On day one I started installing Nagios by following the steps given in the Nagios documentation, everything went fine and no errors were found and Nagios installed successfully I thought I have made it in the first attempt itself then I have opened the link http://<MY IP ADDRESS>/nagios in the browser while I started to browse through the options the problem started, except the home and documentation page none were working.

Error displayed as:

Not Found
The requested URL /nagios/cgi-bin/statusmap.cgi was not found on this server

And it also displayed another error regarding the permission issue, I tried a lot to troubleshoot the issue but unsuccessful.

The second day I Google on this issue and found that lot many people have faced the same problem I tried all the solutions but none were helping my cause. Two days went by in dejection.

Third day I started off right from scratch and succeeded, so finally my nagios started working on my machine for the first time it was like a sigh of relief to me .

“As I’m a newbie in this Linux ocean, every minor success is like a power booster to me. ”

So with this success I can go and try more configurations on my machine and I’ll keep updating you..

“I have started my long journey into Linux with first step “

Here I’m posting the steps I have followed to configure my nagios, so that none of you should waste your valuable time.


Steps to install Nagios on Linux:

1) Before installing Nagios, ensure that the following packages are installed:

   a) Apache

   b) PHP

   c) GCC Compiler

   d) GD development libraries

If not, login as root and install it.

[root@localhost ~]$yum install httpd php gcc glibc glibc-common

[root@localhost ~]$:yum install gd gd-devel


2) Now we have to create a user account and a group for Nagios. Also add the apache user account to the created group.

Become root user and type:

[root@localhost ~]$useradd -m nagios

[root@localhost ~]$passwd nagios

[root@localhost ~]$groupadd nagcmd

[root@localhost ~]$usermod -a -G nagcmd nagios

[root@localhost ~]$usermod -a -G nagcmd apache


3) Create a temporary folder for the downloads and download the latest version of Nagios Core and plugins.

http://www.nagios.com/download

[root@localhost ~]$mkdir downloads

[root@localhost ~]$cd downloads


4) Extract the Nagios tarball

[root@localhost ~]$cd downloads

[root@localhost downloads]$tar xvzf nagios-3.x.x.tar.gz

[root@localhost downloads]$cd nagios-3.x.x


5) After this, we need to compile and install.

[root@localhost nagios-3.x.x]$ ./configure -–with-command-group=nagcmd

[root@localhost nagios-3.x.x]$make all

[root@localhost nagios-3.x.x]$make install

[root@localhost nagios-3.x.x]$make install-init

[root@localhost nagios-3.x.x]$make install-config

[root@localhost nagios-3.x.x]$make install-commandmode


6) Install the Nagios web config file in the Apache conf.d directory.

[root@localhost nagios-3.x.x]$make install-webconf


7) Use the htpasswd to create an account for logging into the Nagios web interface.

[root@localhost nagios-3.x.x]$ htpasswd -c /usr/local/nagios/etc/htpasswd.users nagiosadmin


8) Extract the Nagios plugins tarball

[root@localhost ~]$cd downloads

[root@localhost downloads]$tar xvzf nagios-plugins-1.4.x.tar.gz

[root@localhost ~downloads]$cd nagios-plugins-1.4.x


9) After this, we need to compile and install.

[root@localhost nagios-plugins-1.4.x]$ ./configure --with-nagios-user=nagios --with-nagios-group=nagios

[root@localhost nagios-plugins-1.4.x]$make

[root@localhost nagios-plugins-1.4.x]$make install


10) Check the Nagios configuration for errors.

[root@localhost ~]$/usr/local/nagios/bin/nagios -v /usr/local/nagios/etc/nagios.cfg


11) If there are no errors, start Nagios

[root@localhost ~]$service nagios start

Or

[root@localhost ~]$/etc/init.d/nagios start


12) To start Nagios when the system boots type:

[root@localhost ~]$chkconfig --add nagios

[root@localhost ~]$chkconfig nagios on


13) If you have SELinux installed and with the enforcing mode by default, you probably get some errors in Nagios web interface.

You'll need to change the SELinux context of some Nagios folders.

chcon -R -t httpd_sys_content_t /usr/local/nagios/sbin/

chcon -R -t httpd_sys_content_t /usr/local/nagios/share/

chcon -R -t httpd_sys_script_rw_t /usr/local/nagios/var/rw/
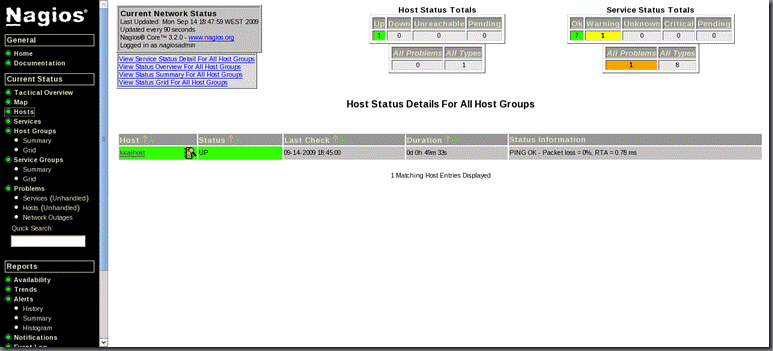
 

clip_image002


clip_image002[9]


Thats all floks !!!!

Monday, November 9, 2009

Understanding DNS

Understanding DNS


When you're browsing mega creations, your computer doesn't send data to www.megacreations.com It sends to 64.179.4.146. You don't have to remember the numerical address - DNS servers do it for you.
This text was written to tell you what DNS is, how it works and how you can use it. It doesn't describe configuration of your own DNS server.
Before I describe how the DNS system works, you need to know about IP adresses and domains.
IP Addresses
64.179.4.146 is an example. IP (Internet protocol) address has a form of four numbers (between 0 and 255), separated by dots. Each machine in the Internet must have an unique IP address. It works as a postal address - no message can reach the machine without a correct address.
Numbers are friendly for machines, but hard to remember for humans. That's why we have hostnames and domains (there are more reasons, for example names allow you to easily change IP addresses of servers - only the DNS entry must be changed).
Hostnames, domains, zones
An example of a hostname: www.megacreations.com It's a part of mega creations.com domain. Last portion of the address (.com) refers to a toplevel domain where the host belongs. Other toplevel domains are: .org, .net, .gov etc. Every country has its own toplevel domain. For example: .fr (France), .de (Germany), .jp (Japan) or .br (Brazilia).
Zone and domain mean nearly the same. There's one difference: zone is delegated to one server. A domain can be diveded into different zones.
How it works?
When you connect to LQ, you send a query to your DNS resolver (more about it later). The server checks if it has needed information cached. If it does, it sends it back to you. The server that stores data from previous queries is called a caching nameserver.
If it doesn't have the information you're searching for, it asks one of the root servers. Root servers are on the top of DNS servers tree (the structure looks like a tree). They contain pointers to name servers for each top level domain.
Now the toplevel domain server for .com is asked about mega creations.com domain, it knows the address of the server containing detailed information about all hosts in the mega creations.com domain.
The last server is asked about the host www.megacreations.com hosts. When your resolver server gets the reply, it sends the result back to you.
Types of DNS servers:
A caching nameserver finds answers to queries and then remembers them. This not only speeds up your response time but helps to keep the load on the root nameservers (which handle thousands of queries per second) as low as possible.
An Authoritative server is a server that can answer queries about a zone without help from any other server. Both primary and secondary servers are authoritative.
Primary server(in terms of specific zone) is a server that reads zone data from its local configuration.
Secondary server(in terms of a specific zone) gets zone data from outside sources (usually from master server).
How to use DNS servers?
The file with IP addresses of your nameservers is /etc/resolv.conf. When the machine is correctly configured, it should look like this:
nameserver 192.168.1.1
nameserver 192.168.1.3
DNS servers are listed in lines beginning with 'nameserver' (there are more things to configure in that file). In the example above there are two DNS servers: 192.168.1.1 and 192.168.1.3 (don't copy them, local addresses are used and it may not work in your network).
There's one more important file - /etc/host.conf. It should look like below:
Quote:
order hosts,bind
multi on
When the file is filled properly, everything should work fine.
Where to get the addresses from?
Your ISP is the best source. Most ISPs have their own DNS servers. They're closest to you (so should be the fastest).
If you're using DHCP (many ADSL connections) or modem, your ISP may pass the information to you when you connect. In such case, you don't need to edit /etc/resolv.conf manually.
How to test it?
You can use 'nslookup' or 'dig'.
First example, using nslookup:
sh-2.05b$ nslookup www.megacreations.com
Note: nslookup is deprecated and may be removed from future releases.
Consider using the `dig' or `host' programs instead. Run nslookup with
the `-sil[ent]' option to prevent this message from appearing.
Server: 192.168.1.1
Address: 192.168.1.1#53
Non-authoritative answer:
Name: www.megacreations.com
Address: 64.179.4.146
As you can see it gives the same answer as we got when ping was used.
Next example, using 'dig'. The command format is:
dig @DNS_server host
It returns more information, so may be harder to read. I'm asking the server 192.168.1.1 about www.linuxquestions.org. You don't need to give the DNS server. If you simply use 'dig.linuxquestions.org', your default DNS server will be used. In the 'ANSWER SECTION' you can see that www.linuxquestions.org is 64.179.4.146. In the line 'Query time' you can see how much time it takes to get an answer. In the example below the time is very short, because I use caching nameserver.
sh-2.05b$ dig @192.168.1.1 www.linuxquestions.org
; <<>> DiG 9.2.2 <<>> @192.168.1.1 www.linuxquestions.org
;; global options: printcmd
;; Got answer:
;; ->>HEADER<<- opcode: QUERY, status: NOERROR, id: 28312
;; flags: qr rd ra; QUERY: 1, ANSWER: 1, AUTHORITY: 4, ADDITIONAL: 0

Sunday, November 8, 2009

Linux Servers configuration: (Squid Server)

After hearing the word "SQUID” Are you thinking about a marine creature with a distinct head, having eight arms and two longer tentacles arranged in pairs?

clip_image002

Nope I’m not talking about that Squid :)

                             Squid is a full-featured web proxy cache server application which provides proxy and cache services for Hyper Text Transport Protocol (HTTP), File Transfer Protocol (FTP), and other popular network protocols. Squid can implement caching and proxying of Secure Sockets Layer (SSL) requests and caching of Domain Name Server (DNS) lookups, and perform transparent caching. Squid also supports a wide variety of caching protocols, such as Internet Cache Protocol, (ICP) the Hyper Text Caching Protocol, (HTCP) the Cache Array Routing Protocol (CARP), and the Web Cache Coordination Protocol. (WCCP).

clip_image004

                            Figure Showing squid server layout.

clip_image005

                                  My Experimentation Setup Layout.

clip_image006

                               Figure Showing Squid-Hierarchy-Schema.

#SQUID CONFIGURATION

NOTE: In this case 192.168.8.x is a squid server, port is 8080 in order to share internet throughout the network.

Requirements:

1) One host station.

2) One free port.

3) Package squid.

Task 1: Setup a Squid proxy server.

Step1: install package

# yum install -y squid

Step2: edit main configuration file

# vim /etc/squid/squid.conf

#(line 73) http_port 8080

Step3: service start

# service squid restart

# chkconfig squid on

Step4: go to url for checkup

#URL->edit->preference->general->connection settings->manual proxy->

http proxy-> 192.168.8.x port-> 8080

Step5: check yahoo.com first it will be blocked by stationX which u can conform from down line

Check for server1 it will come.

Task 2: INSERTING RULES:

Go to configuration file & search for INSERT (line 2517). Write down rules according to ur requirement. Few cases are here, for more cases go through file, u can give any ACL name & can deny-allow by ip/hostname.

Step1: To deny one site

#acl block url_regex .yahoo.com

#http_access deny block

Step2: To allow one network

#acl ournetworks src 192.168.8.0/24

#http_access allow ournetworks

Step3: To deny by time

#acl mytime time SMTWHFA 10:00-20:00

#http_access deny mytime

Step4: To deny one site by time

#acl block url_regex .google.com

#acl mytime time SMTWHFA 10:00-20:00

#http_access deny block mytime

Step5: Start service

# service squid restart

Step6: Go to url check for yahoo.com. It will show u access denied from 192.168.8.X, you can find it in last line and all other sites will be blocked by server1.

Task 3: Setting up "Child Proxy"

In order to make 192.168.8.x as child proxy we need one parent, here server1 is my parent and 3128 is parent proxy port.

Step1: Go to file & search for cache_peer(304 line) & edit like following

# cache_peer server1.example.com parent 3128 3130 default

Step2: start service

# service squid restart

Step3: Go to url & check.

check for yahoo.com it will be blocked & other sites will be accessed.

NOTE: For Exploring more on the acl options refer to the site: http://www.visolve.com/squid/squid24s1/access_controls.php

In case of any problem or queries or suggestions feel free to leave a comment here.. :)

Friday, November 6, 2009

Linux Servers configuration: (Web Server)

A computer that delivers (serves up) Web pages. Every Web server has an IP address and possibly a domain name.

For example, if you enter the URL http://www.redhat.com/index.html in your browser, this sends a request to the server whose domain name is redhat.com. The server then fetches the page named index.html and sends it to your browser.

Any computer can be turned into a Web server by installing server software and connecting the machine to the Internet. There are many Web server software applications, including public domain software from NCSA and Apache, and commercial packages from Microsoft, Netscape and others.

clip_image001

                                   Fig : Layout of a web server

# Web Server Configuration:

NOTE: In my case 192.168.8.X is http server. I have Jack and Jill with password as password for web page access. 192.168.8.Y acting as a client to server 192.168.8.X

Task 1: To host a web site with name station8.example.com

Step 1: Install http package

# yum install http

Step 2: keep required html file with a name index.html in /var/www/html directory

# echo "This is my first web page" > /var/www/html/index.html

Step 3: start the service

# service httpd start (or)

# /etc/init.d/httpd start

Step 4: make the service persistent across reboot.

# chkconfig httpd on

Task 2: To do name based virtual hosting (to host 2 sites stationX.example.com and wwwX.example.com)

Step 1: Append this data into main configuration file.

cat >> /etc/httpd/conf/httpd.conf

NameVirtualHost 192.168.8.X

<VirtualHost 192.168.8.X>

ServerName stationX.example.com

DocumentRoot /var/www/html

</VirtualHost>

<VirtualHost 192.168.8.X>

ServerName wwwX.example.com

DocumentRoot /var/www/virtual

</VirtualHost>

NOTE: stationX.example.com and wwwX.example.com should resolve to 192.168.8.X

# mkdir /var/www/virtual

# echo "testing name based virtual hosting" > /var/www/virtual/index.html

NOTE: /var/www/html and /var/www/virtual directories must present with related index.html!!!!

Step 2: reload service

# service httpd reload

Step 3: check it

# elinks -dump http://stationX.example.com

# elinks -dump http://wwwX.example.com

Task 3: To host a CGI script.

Step 1: modify configuration file.

Now the configuration file has the below content:

<VirtualHost 192.168.8.X>

ServerName wwwX.example.com

DocumentRoot /var/www/virtual

</VirtualHost>

Modify it and now it should look like as below:

<VirtualHost 192.168.8.X>

ServerName wwwX.example.com

DocumentRoot /var/www/virtual

ScriptAlias /cgi-bin/ /var/www/virtual/wwwX.example.com/cgi-bin/

</VirtualHost>

Step 2: create the directory and keep the required cgi script and make it executable

# mkdir -p /var/www/virtual/wwwX.example.com/cgi-bin

# cd /var/www/virtual/wwwX.example.com/cgi-bin

# wget ftp://192.168.8.254/pub/gls/test.sh

# chmod 755 /var/www/virtual/wwwX.example.com/cgi-bin/test.sh

Step 3: reload service

# service httpd reload

Step 4: check it

# elinks -dump http://wwwX.example.com/cgi-bin/test.sh

It should show u by executing test.sh!!!

In case of any problem or queries or suggestions feel free to leave a comment here.. :)

Wednesday, November 4, 2009

Linux Servers configuration: (FTP Server)

Today I’m going to tell you the basic configuration steps of some of the servers used in Linux like FTP, HTTP and SQUID. These configurations are important in the prospective of your RHCE exam also. Hope these Posts will be informative and help you to crack your RHCE exam.

FTP (File Transfer Protocol) Configuration:

The objectives of FTP are:

1) To promote sharing of files (computer programs and/or data),

2) To encourage indirect or implicit (via programs) use of remote computers,

3) To shield a user from variations in file storage systems among hosts, and

4) To transfer data reliably and efficiently.

FTP, though usable directly by a user at a terminal, is designed mainly for use by programs.

clip_image001

                                   Figure showing FTP Schema

clip_image002

       Figure showing the transfer of files from a FTP Server to a FTP Client.


# VSFTPD Configuration.

NOTE : In my case 192.168.8.1 is ftp server i have Jack and Jill with password as password in server. 192.168.8.2 and 192.168.8.3 is acting as ftp client to ftp server 192.168.8.1.

Task 1: To Allow ftp user to download files

IN 192.168.8.1:

--------------

Step 1: install vsftpd package

# yum install vsftpd

Step 2: keep the required files in /var/ftp

# touch /var/ftp/f{1..5}

Step 3: start vsftpd service.

# service vsftpd restart

Step 4: make the service persistent across the reboot.

# chkconfig vsftpd on

IN 192.168.8.2:

--------------

Step 1: check whether ftp user is allowed to download files or not.

# ftp 192.168.8.1

ftp> get f1

ftp> bye

Task 2: To Allow ftp user to upload files

IN 192.168.8.1:

---------------

Step 1: create a directory may be /var/ftp/upload which is writeable by ftp user.

# mkdir /var/ftp/upload

# chgrp ftp /var/ftp/upload

# chmod g+w /var/ftp/upload

Step 2: Allow anonymous user to upload the files in configuration file.

line 27 looks like:

#anon_upload_enable=YES

it should be uncommented and now it should look like:

anon_upload_enable=YES

Step 3: restart vsftpd service.

# service vsftpd restart

Step 4: make changes in SELinux policy to allow anonymous user to upload files

# setsebool -P allow_ftpd_anon_write=1

Step 5: change context of directory to allow anonymous user to upload files

# chcon -t public_content_rw_t /var/ftp/upload

IN 192.168.8.2:

--------------

Step 1: create the file which you want to upload.

# touch /root/client1

Step 2: check whether ftp user is allowed to upload files or not.

# ftp 192.168.8.1

ftp> cd upload

ftp> put /root/client1

ftp> by

Task 3: To Allow normal user Jack with password as password to download and upload files.

IN 192.168.8.1:

----------------

Step 1: Create user Jack with password as password

# useradd Jack

# echo "password" | passwd --stdin Jack

( NOTE: Use the above mentioned technique to assign password for the user instead of the traditional method "passwd <username>", coz here there is no need to type the password 2 times so it saves some time in RHCE exam and you can also know what password you are providing so it reduces the probability of assigning a wrong password to the user).

Step 2: keep some files in Jack user’s home directory.

# touch /home/Jack/b{1..5}

Step 3: change SElinux policy so that normal users can get access to their home directories.

# setsebool -P ftp_home_dir=1

IN 192.168.8.2:

--------------

Step 1: create the file which you want to upload.

# touch /root/client2

Step 2: check whether Jack user is allowed to upload files or not.

# ftp 192.168.8.1 -u Jack

Password:

ftp> get b1

ftp> put /root/client2

ftp> bye

In case of any problem or queries or suggestions feel free to leave a comment here..:)

Tuesday, August 11, 2009

How to configure NFS


On Redhat systems

Create the configuration,
vi /etc/exports
for example,
/path/to *(ro,no_root_squash)
Apply,
service nfs start
Defenitely if you like,
chkconfig portmap on
chkconfig nfs on


################################################################################


HowTo configure NFS

1. Introduction

The Network File System is certainly one of the most widely used network services. Network file system (NFS) is based on the Remote procedure call. It allows the client to automount and therefore, transparently access the remote file systems on the network.

2. Scenario

In this scenario we are going to export the file system from the linuxconfig.org (IP address 10.1.1.200) host and mount it on linuxconfig.local(IP address 10.1.1.100).

3. Prerequisites

At this point, we assume that the NFS service daemon is already installed on your system, including portmap daemon on which NFS depends on. Moreover, your system needs to support the NFS file system.
$ cat /proc/filesystems 

NFS file system supported

NFS daemon should be listening on both standard ports 2049 and portmap on port 111.

NFS daemon port 2049 portmap port 111
Another way to check if NFS is functioning, is to use the rpcinfo command.

# rpcinfo -p

You should get a response/output similar to one below:

check if NFS is functioning

4. Server export file

All NFS server exports need to be defined in /etc/exports file.

4.1. Most common exports options

Here are a couple of the most common export techniques and options:
/home/nfs/ 10.1.1.100(rw,sync) export /home/nfs directory for host with IP 10.1.1.100 with read, write permissions, and synchronized mode
/home/nfs/ 10.1.1.0/24(ro,sync) export /home/nfs directory for network 10.1.1.0 netmask 255.255.255.0 with read only permissions and synchronized mode
/home/nfs/ 10.1.1.100(rw,sync) 10.1.1.10(ro,sync) export /home/nfs directory for host with IP 10.1.1.100 with read, write permissions, synchronized mode, and also export /home/nfs directory for hosts with IP 10.1.1.10 with read only permissions and synchronized mode
/home/nfs/ 10.1.1.100(rw,sync,no_root_squash) export /home/nfs directory for host with IP 10.1.1.100 with read, write permissions, synchronized mode and the remote root user will not be treated as a root but as a default nfs user.
/home/nfs/ *(ro,sync) export /home/nfs directory for any host with a read only permission and synchronized mode
/home/nfs/ *.linuxconfig.org(ro,sync) export /home/nfs directory for any host within linuxconfig.org domain with a read only permission and synchronized mode
/home/nfs/ foobar(rw,sync) export /home/nfs directory for hostname foobar with read, write permissions and synchronized mode

4.2. Edit exports file

Open up your favorite text editor, for example, vim and edit /etc/exports file and add line /home/nfs/ *(ro,sync) to export /home/nfs directory for any host with read only permissions. edit NFS exports file Be sure that the directory you export by NFS exists. You can also create a file inside the /home/nfs directory which will help you troubleshoot once you mount this file system remotely.
# touch /home/nfs/test_file 

4.3. Restart NFS daemon

Once you edit /etc/exports file you need to restart NFS daemon to apply changes in the /etc/exports file. Depending on your Linux distribution, the restarting of NFS may differ. Debian users:
# /etc/init.d/nfs-kernel-server restart 
Redhat users
# /etc/init.d/nfs restart 
If you would, later, decide to add more NFS exports to the /etc/exports file, you will need to either restart NFS daemon or run command exportfs:
# exportfs -ra 

5. Mount remote file system on client

First we need to create a mount point:
# mkdir /home/nfs_local 
If you are sure that the NFS client and mount point are ready, you can run the mount command to the mount exported NFS remote file system:
# mount 10.1.1.200:/home/nfs /home/nfs_local 
In case that you need to specify a type of the filesystem you can do this:
# mount -t nfs 10.1.1.200:/home/nfs /home/nfs_local 
You may get error message
mount: mount to NFS server failed: timed out (retrying). 
This may mean that your server supports higher versions of nfs you need to pass tone extra argument to you nfs client. In this example we use nfs version 3:
# mount -t nfs -o nfsvers=3 10.1.1.200:/home/nfs /home/nfs_local 

Mount remote file system on client

Now you should be able to see that the file system is mounted. Notice that the mount command reports that the filesystem is mounted as "read and write", although you can see that it provides a "read only" permission.

6. Configure automount

To make this completely transparent to end users, you can automount the NFS file system every time a user boots a PC, or you can also use PAM modules to mount, once a user logs in with a proper username and password. In this situation just edit /etc/fstab to mount system automatically during a system boot. You can use your favorite editor and create new line like this:
10.1.1.200:/home/nfs /home/nfs_local/ nfs defaults 0 0 
in /etc/fstab or
# echo "10.1.1.200:/home/nfs /home/nfs_local/ nfs defaults 0 0" >> /etc/fstab 
Configure NFS automount

7. Conclusion

The Network File System comes with tons of export options. What has been shown here, just barely scratches the surface of NFS. Please visit Linux NFS-HOWTO hosted by linux documentation project or NFS homepage for more details.

Monday, July 13, 2009

Mounting_NFS_File_Systems-Using_TCP

https://www.redhat.com/docs/manuals/enterprise/RHEL-4-Manual/en-US/System_Administration_Guide_/Mounting_NFS_File_Systems-Using_TCP.html
 
Things You Should Know About Linux !!!